GETTING STARTED
**This assumes that you have a fresh install**
Possible handy tip: Start a new game/continue existing, but when you have the Tactical Screen up, press ‘Shift-prt scr’. This will capture the screen and place it in your JA2 folder. Print this off. It makes for a very handy reference when modding.
(A)
Make sure you have the latest JA2 113 up and running.
In the JA2 folder, you should have the main JA2(game).exe, the Map Editor.exe, shortcut to Map Editor and create Radarmaps shortcut.
If you do not have the last two shortcuts, create them by the following method.
(Double clicking on the Map Editor.exe will only result in your starting a de-bug version of the game).
1) Right click on Map Editor.exe and select Create Shortcut.
2) Right click this shortcut and select Properties.
3) The Target reads “c:\TalonSoft\Ja2\Map Editor.exe”.
4) Change to “c:\TalonSoft\Ja2\Map Editor.exe” –EDITORAUTO
You now have the working shortcut to the Editor.
Follow steps 1 through 3 again:
4) Change to “c:\TalonSoft\Ja2\Map Editor.exe” –DOMAPS
You now have the Create Radarmaps shortcut.
All your shortcuts can be placed wherever you find them most convenient.
I find it handy to have everything either in, or local to, the JA2 folder(s).
(B)
1) Create a new folder in JA2\Data called Maps.
2) Repeat for new folder Radarmaps.
(C)
You must now extract the maps from Data\Maps.slf
There are a few utilities available to get this job done. I use Dragon UnPacker. It is free and very handy. Google-search it. Download it. Keep it safe!!
Extract the Maps to your empty Maps folder in Data.
Might be an idea to copy/paste the maps folder somewhere safe. It is very easy to mess a sector up.
This way, you can at least copy/paste the relevant map sector back in to overwrite the messed up one.
Double click on the Shortcut to Map Editor. Note the following:

1) This reference is peculiar to JA2UB map. It can be altered, but not really worth the trouble.
2) Overview information for the sector.
NOTE: You will not have any detail loaded.
Instead, you will be asked to load default maps y/n.
Type ‘y’ and the maps will be loaded.
3) Click the Load button. This will load the details of the sector.
4) Click the Okay button. This will take you to the editor and the map sector.
NOTE: If you should wish to return to this screen simply press F5 and F5
again to go back to editor.
NOTE: The small buttons under the map are denoted as follows:
A = All
G = Ground
B1 = Basement Level 1
B2 = Basement Level 2
B3 = Basement Level 3
At the moment, basement levels can only be placed at existing basement sites.
Check in your Maps folder and take note of all map sectors that have a notation to them.
Example: A10.DAT also has A10_B1.DAT.
All the other options (un-checked boxes) are best ignored for the present, as we are starting from new and not an existing project.
After clicking the Okay button, you will now see something very similar to this. This is the Options Screen:

This is a general command screen. You can hover your mouse over the 8 buttons to get a brief notation of function.
The following is a guide on these functions and any areas to be particularly aware of.
Rule that ALWAYS applies: Save Often. The editor can and does crash. There is nothing worse than spending hours mapping, only to lose it all through a crash.
1) This starts a new, ground map area. You are given a blank canvas (of sorts) from which you can start to build.
2) New basement level, as above.
3) New cave level.
4) Holy Grail button – save, save, save!!
5) Load an existing map (from your maps folder).
6) Load tileset. This enables you to set out the ‘theme’ of your map, as in Town, Coastal, Mine etc…………See note below.
7) Exit to game. Unless you are in a game, if you use this you will be stuck between the editor and the desktop. I never use this.
8) Exit. Simple!!
9) Co-ordinate of the cursor on the map screen. This is the red ‘diamond’ roughly central to the map. Every ‘tile’ of the map has a number.
Note: It is possible to load a tileset ‘over’ one already in use in an existing map. Example: A9 uses Omerta tileset. You could replace this with the Coastal tileset, save and then re-load. The results, mostly, are pretty much un-usable. However, with experimentation, it is quite possible to use this method and achieve workable results. Best bet is to experiment with this once you are familiar with mapping.
Now, select a tileset to use, or, continue with the ‘default’. The following is all done with the ‘default’ (OMERTA) tileset.
OVERVIEW OF OPTIONS TABS
1) TERRAIN.
Clicking on this gives the following screen and further options to customize your terrain.

Note the ‘black rectangle’, on the left, with the terrain tile inside. This is the selected ground cover used at present and denoted by the ‘red rectangle’ around the first of 9 terrain types. The whole of the map, at present, is covered by this selection. Hover your mouse over the buttons to get an idea of the options available to you.
The DRAW GROUND TEXTURES button is always selected by default. You can return to this by selecting this button again, or, by use of the shortcut ‘G’.
Note that the last two textures are water. The first is shallow water, second is deep water.
You may change the maps ‘base ground texture’ to whatever you wish to start with.
Simply select SET MAP GROUND TEXTURES button and choose the terrain type you want.
You can also use the FILL button to ‘flood’ the whole area with the desired texture.
NOTE. The desired texture will not always fill to the edges of your map. Use the ‘i’ key to look at the overview. This will highlight any problems. You can manually fill to the edges where needed. You can also use the SHIFT key, which will allow you to extend beyond the edges of the map.
MIXED GROUND TEXTURES
The editor will mix multiple textures to create a random terrain detail.
Hold the SHIFT key down and select the terrain types you want included.
A red number will appear under every terrain type selected. By SHIFT-clicking again on the selected type, you can increase the number. Increasing this number gives ‘weight’ to the instances of it being used. To reduce this number, right click on it. To return to drawing with a single texture, hit the SPACEBAR.
Experiment with this until you are confident of its’ use.
WATER.
As explained, there are two types. Shallow water, 8th. from right and the last, deep water.
Shallow water MUST be placed first, as this will form land edges. You can then deepen the water further out from the land edges.
SPECIAL NOTE. If you wish to change a section of water back to land, you MUST ERASE that section of water and replace with your terrain type.
If you simply place terrain over water, there can be adverse results when used in-game.
CHANGE BRUSH SIZE.
You can hit the A or Z keys, or click on the CYCLE BRUSH SIZE button.
The area of the brush size is denoted by red squares on the map.
There are 4 sizes: Small, Medium, Large and XLarge. The final 2, Width and Area, are explained below.
WIDTH.
You can click, hold and drag to draw a straight line with a width of one tile. You can increase the width, up to 8 tiles, by hitting the ‘.’ (period) key. To decrease, hit the ‘,’ (comma) key.
AREA.
Click and hold to draw a box that will be filled.
BRUSH DENSITY.
A percentage is shown in the terrain panel. It is the density of the graphic that will fill the area under your brush. The density can be increased by clicking on the ‘up’ button beside the box. You can also hit ‘]’ (bracket) to increase. To decrease, click on the ‘down’ button beside the box, or, hit ‘[‘ (bracket).
100% will solidly fill an area. Use a lower % to thin the area of cover.
Useful for rocks, debris and trees/bushes etc…………
UNDO.
You can click on the UNDO LAST CHANGE button. This will allow you to undo the last 10 changes only. You can also hit BACKSPACE key for the same effect.
ERASE.
With the button for the type of graphic you wish to erase pressed (trees,road,ground etc….), click on the erase button and draw over the area you want to alter. You can also hit ‘E’ key. You can change the brush size to increase/decrease the erase size.
ROADS.
Clicking this button will bring up a sub-panel that contains all the road tile pieces.

Press the button with the road detail on it. The black rectangle displays the currently selected road tile.
Right click on the road button to bring up the sub-panel shown above.
All the road tiles here fit together like a puzzle.
The first two pieces are two halves of the road running from SW to NE.
The next two run from NW to SE.
The following 8 pieces are used for corners and turns.
There are 4 pieces that have no edges and are used for intersections.
Experiment with laying roads to get the hang of it.
Start by laying your road(s) inboard from the edge of the map. You can use the ‘i’ key to see what your work looks like.
To get the roads to meet the edges properly, use the SHIFT key to move beyond the map edge and lay your road tiles. Keep using the ‘i’ key to check.
IMPORTANT NOTE.
Roads, at the moment, are a pain in the (insert expletive) to use when it comes to saving.
When saving, you will normally get an ‘OBJECT COUNT’ error, listing the tile number and number of error counts.
There is no way around this. You must ERASE the offending road tile under the grid number given and re-lay the road tile. You must do this for every error count until you get a ‘clean’ save.
SUGGESTION.
Try laying only a set of 8 road tiles and save. Sort out any errors and save.
It would appear, that once a clean save is achieved, laying roads settles down and few(er) errors are encountered. If you lay a large section of road and try to save, you will spend frustrated ages sorting the errors out.
Once ‘settled’ down, try to keep your road laying to relatively small sections and save. This method works for me!!!
LOADING YOUR BRUSH.
You can add a graphic to your brush ‘queue’ by simply selecting the tiles you wish to use. A number will appear under the graphic selected. With road tiles, only select one of each. Having the tiles in a queue on your brush, saves the job of continually opening the road button and selecting the next graphic. To cycle between the graphics on you brush, use the PAGE UP and PAGE DOWN keys. The selected graphic will appear in the black rectangular box and on your brush cursor.
DEBRIS.
Shortcut = D.
Allows you to place rocks, weeds etc…….You can place these items individually, or, select a number of them to be randomly placed under your brush. Giving a certain graphic ‘weight’ (greater number) increases the cover it will give. You can also use A and Z keys to increase/decrease brush size.
It is usually best to leave debris until last.
Some tilesets have debris that will tile together to form carpets and other floor graphics. With these, you must place each part individually. Loading your brush with these graphics will only result in the editor laying these at random.
TREES & BUSHES.
Shortcut = T.
As with the above, you can load your brush with selected trees and bushes, then place individually, or cover areas. You can set the density and brush size.
NOTE. If you set density to 100%, especially at the edges, you will create areas your MERCS cannot enter from. Be careful and think ahead as to where your MERCS can/cannot be permitted to enter/exit the map.
TREETOPS can be removed by the use of SHIFT-T. This can be very helpful, as trees can hide what you are doing. ALSO, be careful how close you place trees to buildings, as trees and roofs can merge and look odd in-game.
ROCK & OTHER JUNK.
Shortcut = R & O.
Contain rocks, bushes,barrels,crates etc………….
Can be loaded onto brush as with the above and set to cover large/small areas.
NOTE. Some containers are considered to be ‘openables’. That is, items can be placed within. Most of these ‘openables’ are obvious, but not all can be used as such. More detail on this is covered in ITEMS section.
BANKS AND CLIFFS.
This contains a variety of graphics. You can find various fence types, rocks/barrels with water features.
Cliffs are a particularly difficult graphic to use. They can produce major glitches which will affect your map. Only experimentation will prove useful here.
As a general tip: Try to limit your placement of cliffs to either EW or SN directions. Diagonal (SW,NE etc…), tend to produce the most errors.
2) BUILDINGS.
Shortcut = B.

As can be seen above, the options are divided into 3 areas.
SELECTION METHOD.
Used to place or alter specific building or furniture pieces.
SMART METHOD.
Allows windows, doors and interior walls to be placed with greater ease.
BUILDING METHOD.
Allows you to quickly place the shell of a building, make additions/deletions or delete whole sections.
BUILDING METHOD.
Making the shell.
Choose the button ADD A NEW ROOM and right click to enter the graphics selection sub-screen.
You will see 4 wall choices, 4 floor choices, 4 flat and 2 slanted roof choices.
To draw a complete building, choose 1 wall, 1 floor and 1 roof. If you choose more than one of each item, the editor will decide at random which to use, but will not intermingle them.
Return to the map. Click and hold to draw a box, your building will fill that area. Release the mouse button and the building is placed. You can add to your building by drawing additional boxes that touch your original building. The editor will match the tiles together.
HIDING ROOFS AND WALLS.
H key will hide roofs.
W key will hide walls.
There are also toggle buttons for roof, wall and room info on the left of the editor screen above. These will be discussed later.
REMOVE BUILDING SECTION.
To completely remove a section of a building, click on REMOVE AN AREA FROM AN EXISTING BUILDING. Click and drag a box over the area you want to remove. Releasing the mouse button deletes the area selected.
REMOVEBUILDING.
To remove an entire building and its contents, click on REMOVE A BUILDING, click anywhere in an existing building to delete it.
COPYING AND MOVING.
With the COPY A BUILDING or MOVE A BUILDING button selected, click anywhere in an existing building and hold. You will see a red grid representing the building appear. Drag this grid to the area you want this building to appear in, release the mouse button.
This is best done to a building that has been fully completed and furnished.
NOTE. Room numbers (discussed later) will NOT be retained or duplicated.
SMART METHOD.
Interior walls.
In the smart method section, choose PLACE WALLS USING THE SMART METHOD button. Match the wall type you have by hitting PAGE UP/PAGE DOWN to cycle through the 4 wall types. Wall type is displayed in the lower left of the blue panel.
You MUST start with your cursor touching an existing wall for the ‘smart wall’ to draw properly. Click, hold and drag and a wall will be drawn that automatically joins the other wall(s). When dragging the wall sections, you can draw corners, intersections etc….. To remove any section of wall, right click it.
GLITCHES.
Occasionally, you may find it difficult to get an intersection to place properly. If this happens, right click a few sections to remove them and re-draw the section that refused to place properly. Re-draw the two removed sections.
It is possible for you to get glitches where shadows remain behind, wall pieces in the middle of nowhere etc……
This may happen when you use BACKSPACE to undo building related operations. As an emergency operation, you can remove EVERYTHING on a given tile by hitting the DELETE key with your cursor on the offending tile.
This will remove EVERYTHING from that tile and revert it back to its original land type. It will NOT FIX the graphics touching that tile, so you can end up with pieces missing from roads, water etc…. where the surrounding tiles no longer blend correctly. It is recommended that you use ERASE or right clicks before using delete.
ADDING WINDOWS AND DOORS.
Editor will place the correct door or graphic piece to fit the direction of the wall when using the PLACE DOORS USING SMART METHOD or PLACE WINDOWS USING SMART METHOD buttons pressed. There are window and door variations available, you can PAGE UP/PAGE DOWN to cycle through them. The graphic will be displayed in the lower window. Click on any section of wall, interior or exterior, and it will correctly place door/window selected.
DAMAGED WALL SECTIONS.
Same process as for above.
SELECTION METHOD.
There are a number of buttons available in this section. You can manually choose pieces of wall, roof, shadow etc….should you need to ‘fix’ a hole or glitch. You can manually choose damaged wall pieces or windows, but you will need to make sure that you match the interior/exterior walls properly, and are facing the correct direction.
This section also contains the 2 buttons that hold the furniture graphics, plus one for wall decals. It is really up to you to browse these areas and experiment with what is available.
OPENABLES.
Some pieces of furniture are considered openables. That is, they have an open or closed state to them. Some, when looking at the graphics, are obvious, because the graphics show a choice between open and closed state. This allows you to place items within for your player to discover when opened in-game. Remember. Not all objects that look like they can be opened, can be.
SWITCHES.
The wall decals section may contain switches.
You can place these on walls for your player to interact with, or for the enemy to interact with. For this to happen, they have to be used with TRIGGERS, which is covered in the ITEMS section.
LIGHTS.
The wall decal section may also contain lights. You may place these almost anywhere on the walls of your buildings. However, getting them to work is covered in the MAP INFO section.
STAIRS.
Not all tilesets will include stairs. Look in the DEBRIS slot to find graphic pieces that tile together to form stairs or ladders going down. Placing stairs is similar to placing double or garage doors. You may need to remove sections to allow for the stairs.
ROOM INFO.

When you building is completed, you will need to add room info. This information will allow the roof to disappear correctly when your player looks into or enters a building or room.
Clicking on DRAW ROOM NUMBER will place numbers on the floor tiles. When a player views a numbered tile, the game will remove the roof from ALL tiles with the same number – even if those tiles are behind walls or impossible to be seen. If they have the same number, they WILL be removed. Therefore, be very careful about how you place these numbers. Try to imagine it is YOU, in real life, entering the room/building – what would you expect to be able to see? Number accordingly.
Note that while a roof tile may be removed, if your player does not have direct line of sight to that tile, you will NOT see enemies or items that may be there ie. There are separate systems controlling what you see.
When you click on the room info button, you need to ensure that your brush size is either AREA or WIDTH. Room numbers will not be placed with any other size selected.
The best way to place room numbers is to do one window or door at a time.
Figure out the line of sight for that particular opening and lay down a common number that relates to it. The editor will automatically go to the next number when you place down the room info for the following door or window.
Sometimes, you may want to give two separate areas the same numbers or add another section to an existing number. In order to do this, you must manually enter the number in the box labelled room#. IMPORTANT: You MUST hit ENTER key after entering the number. The number in the box highlighted in red will turn black to confirm its acceptance.
LOCKING DOORS,CRATES,OPENABLES etc……

Above example is where the KEY button is pressed and a door selected (see cursor on map). Equally, you can select crates, lockers, cupboards chests etc….and apply locking attributes to them.
Each lock ID has its own ‘toughness’, of which the ID description should give you an idea. Each ID/lock type also corresponds with a specific key which you can place via the ‘items’ tab.
The editor does not, as far as I know, allow you to place locks with timers on them, like the civilian houses or shops that open and close at night.
Trap type
|
Trap level (determines toughness of the trap)
|
0 = no trap
|
From 1 to 20
|
1 = explosion trap
|
10 and above are too high for any MERC
|
2 = electronic trap
|
to unset. 4 to 6 is average.
|
3 = siren type
|
|
4 = silent alarm
|
|
5 = nothing?
|
|
6 = super electric trap
|
|
Below is an editor description of attributes applied to some lockables.
| # |
Description |
Pick |
Smash |
| 0 |
Crate |
10 |
25 |
| 1 |
Tough crate |
15 |
56 |
| 2 |
Queens basement metal door |
75 |
100 |
| 3 |
Cheap house |
17 |
56 |
| 4 |
House |
24 |
58 |
| 5 |
Metal door |
50 |
80 |
| 6 |
Padlock |
30 |
75 |
| 7 |
Average electronic |
40 |
70 |
| 8 |
Queens basement |
80 |
80 |
| 9 |
Pass normal |
50 |
74 |
| 10 |
Pass tough |
75 |
80 |
| 11 |
Passcard Orta K4 |
254 |
254 |
| 12 |
Brothel back door |
65 |
65 |
| 13 |
Tixa cells |
60 |
120 |
| 14 |
Solid house |
36 |
75 |
| 15 |
ACA cells |
30 |
70 |
| 16 |
San Mona hotel |
32 |
68 |
| 17 |
Very tough crate |
36 |
74 |
| 18 |
Alma cells |
65 |
95 |
| 19 |
Wardens office |
55 |
80 |
| 20 |
Alma metal door |
75 |
95 |
| 21 |
Alma garage door |
40 |
76 |
| 22 |
Alma entrance |
95 |
95 |
| 23 |
Alma guardrooms |
20 |
50 |
| 24 |
Tixa metal door |
38 |
80 |
| 25 |
Orta basement |
254 |
254 |
| 26 |
Orta control door |
75 |
120 |
| 27 |
Orta pass Ernest |
75 |
80 |
| 28 |
San Mona desk |
55 |
110 |
| 29 |
Medical warehouse |
60 |
120 |
| 30 |
Delivery warehouse |
50 |
120 |
| 31 |
Shooting range |
60 |
120 |
| 32 |
Doreens stash |
50 |
120 |
| 33 |
Grumm Nmap warehouse |
90 |
120 |
| 34 |
Grumm Smap ACA stash |
80 |
120 |
| 35 |
Meduna air barracks |
90 |
120 |
| 36 |
Meduna sam barracks |
80 |
89 |
| 37 |
Palace door |
85 |
120 |
| 38 |
Hicks crate |
25 |
56 |
| 39 |
Alma metal door |
55 |
90 |
| 40 to 63 are unused in JA2 |
# = Lock ID
Pick = Picking difficulty
Smash = Smashing difficulty
3) ITEMS TAB.
To put items down in your map, click on the items tab.
You will see a number of sub-tabs appear along the bottom where the items are divided into categories, eg. Weapons, armour etc….E1, E2 and E3 contain miscellaneous items such as med. Kits, camouflage kits etc……Explore all of these to see the full options available to you.
To place an item on or in your map, select it by left clicking on it. Move your cursor to the tile you would like it to appear on/in and left click.
Items will be ringed with a green circle and the item that is currently selected will have its name appear.
See below:

Items/weapons detail.

Items/armour/condition etc……………….
On the far right of the blue panel above, you have the ability to control some of the information before placement. For instance: you can control the chance of it appearing in your map by changing the EXIST CHANCE value. Where the number specifies the % chance of it appearing, eg. 100 = Always there. 80 = 80% chance etc…….
You may also be able to adjust the quantity of an item (eg. Ammo clips, grenades) or add things like scopes or ceramic plates to weapons and armour.
You can control the status of an item, which basically means the condition it is in. Status of 100 is perfect, 25 is almost useless.
You can also booby trap the item(s) by placing a numerical value in the appropriate box. This value roughly represents the experience level needed to detect the fact that it is trapped. The higher the number, the less chance the trap is detected. 11 or above would mean that it will probably never be detected.
When you put down an item, a number will appear next to the item in the blue panel. This tells you how many of that item has been placed in the map. If you right click on the item graphic that appears in the blue panel, the editor will cycle through the location of each item of that type.
With an item selected, you can delete it by hitting the DELETE key.
HIDDEN ITEMS.
There is a toggle for hiding items. If you place an item into an openable structure (eg. Crate, cabinet etc…), this flag will automatically be set to ON. You will see the letter H on the item confirming it is hidden in the openable. When an item is hidden like this, the players MERC will not spot the object until the openable object is actually opened. Any item sitting on any tile can be given the hidden flag, but then the player must actually search the tile to find the item. Non-hidden items are considered to be sitting on top of whatever they are placed upon and will be spotted as soon as the item(s) enter the line of sight.
TRIGGERS.
You can use triggers to create a variety of situations, from pressure plates that set off explosions to wall switches that open doors.
Under the triggers tab, you will see individual items for Panic Triggers (1 through 6) and under those, Panic Actions (1 through 6). Using the arrows to the left, you can scroll through the list and see Triggers (1 through 10) and Actions (1 through 10) underneath them.
At the end of the list you will see Pressure Actions – a Trigger is necessary for these.

Triggers and actions must be used together – with the exception of Pressure actions.
Place a numbered trigger on the map, then place the same numbered action(s) on the map for them to be associated.
When you put down any of the Action items, you will see a button on the right side of the blue panel. When you click on this button, a list of all the available actions will appear (eg. Explosions, open door, alarms, etc….).
Buttons, switches and other similar graphics can usually be found by pressing the Wall Decal button in the BUILDINGS TAB menu. Once you have placed the graphic, the trigger or action ‘item’ is always placed on the tile ‘behind’ the wall switch or door it is acting upon.
PANIC TRIGGERS.
Panic Triggers and Panic Actions are things that the enemy will use once they are aware of your presence. In general, enemy’s will keep trying to pull a panic trigger, such that, if you kill an enemy that is heading for the trigger, another will try to get to it in his place.
If a Panic Trigger has been given the action – alarm, an enemy will try to set it off only if your presence in the sector has not become ‘common knowledge’. In other words, enemy’s will not try to pull a trigger associated with an alarm action once a general alert has been sounded.
Tolerance means that the enemy will only go for the panic trigger once a certain percentage of the total enemy’s in that sector have been killed. So, if you enter a value of 80, it means that 80% of the enemy’s must be killed before any of the remaining enemy’s would go for the trigger.
Example:
You placed the graphic of a red button on the wall of a Guardhouse. You want the enemy’s inside the guardhouse to sound the alarm if they spot any intruders.
Click on Panic Trigger 1 and place it on the tile behind the red button. The letter H should appear on the placement confirming that it has been attached to the button.
Click on Action 1 and set the action to be Alarm (or Global Alarm, if you want the whole world to hear it), then place your cursor over the map where you want the alarm to sound.
GENERAL TRIGGERS.
Unlike Panic Triggers, the MERCS themselves activate general triggers. That is, the player would have to trigger the action to happen (usually unknowingly). However, the theory behind placing them on the map is pretty much the same.
Example:
If you want a wall switch to set off a series of teargas explosions in another building, you would place the Trigger 1 on the tile behind the section of wall you have placed the switch on. You would then place the corresponding Action 1 (as many as you want) on the tiles where you want the teargas explosions to go off, making sure that you have chosen Teargas Explosion from the action list.
If you want another wall switch in the same map to open all the doors into a room, you would put Trigger 2 behind that switch, and Action 2 items behind every door that you want to have opened when the switch is pulled, making sure you switched from Teargas Explosion to Open Door on the actions list.
The actions corresponding to a trigger do not need to be the same. In the above example, you could have your Trigger 1 switch be associated with both Action items by simply making Action(s) 1 that set off explosions, and placing another Action 1 item(s) that affects doors.
The trap level affects how skilled someone must be to detect the presence of the trigger and is somewhat tied to the MERCS experience level.
Setting the trap level to 4 means that, in general, a level 4 MERC could detect it. If you set it above 11, it means that it will probably never be detected.
4) MERCS TAB.

This is where you populate your map.
Things to remember:
Every map you make MUST have 32 enemy’s placed within it.
It is not necessary to have ALL your enemy’s detailed and prioritised to show up. Have a few prioritised, like guards, snipers etc…, the rest – leave it to the game engine to place them at random. It all counts toward re-playability.
Bloodcats are optional.
Civilians (NPC) are optional, Non Recruitable.
Civilians (RPC) are optional, Recruitable.
You can ‘convert’ an enemy into a tank, certain vehicles etc…but this still counts towards the 32 total.
You can specify your enemy type: Male/female, Army/Admin./Elite, Big body/Small body etc……
You can specify enemy’s temperament and orders.
You can equip your enemy’s.
You can almost do the same with RPC’s and to a lesser degree NPC’s.
The following deals primarily with enemy placement. Where applicable, it will also refer to NPC and RPC placement.
With the enemy button selected – will turn from red to yellow – click on an area of your map where you would like an enemy to be and it will be created. Now you can fully edit this enemy.

As can be seen, this enemy is designated as Army-Average Attributes-Good Equipment-Close Patrol Order-Cunning Aid Attribute. All of these can be altered by clicking on the relative buttons.
The ‘direction’ arrows (just above the orange MERCS tab) allow you to alter which way your enemy/civilian faces.
To move this enemy to a different location, simply right click on the new tile location.
To place this enemy on a roof (flat roofs only), hit PAGE UP and right click on roof location you want the enemy placed. To return to ‘ground level’, hit PAGE DOWN.
NOTE: Depending upon what is below the roof tile selected for placement, you may or may not be allowed to use it. If not, try a tile close by.
Example: If you have an enemy inside a building, the roof tile directly above this enemy cannot be used to place your additional enemy on the roof. This sometimes applies to other ‘large’ items placed within buildings.
You can delete a selected enemy by simply hitting the DELETE key.
You can ‘copy’ an enemy. With the enemy selected, hit CTRL-C, then select your area for your ‘copy’ and hit CTRL-V, you can do this for as many, or as few, as you wish, subject to the 32 limit.

The ‘Find’ button will center on the selected enemy/civilian.
NOTE: Admin is weakest enemy.
Army is normal.
Elite is strongest.
If you definitely want this, or other, enemy’s to show up in-game, click the box marked with ‘!’. Leaving this un-checked will allow the game to randomly place enemy’s.
ENEMY ORDERS AND ATTITUDE.
* Stationary. Does not move from tile unless he sees intruders or is under fire, in which
case, he can move up to 5 tiles away.
* On Guard. Stays within 5 tiles of where he is placed.
* Close Patrol. Patrols within 15 tiles.
* Far Patrol. Patrols within 25 tiles, increases to 50 once he is aware of intruders.
* On Call. Patrols within 10 tiles, increases range to 30 once aware of intruders, will
respond to other enemy’s call for help.
* Seek Enemy. Pretty much patrols the whole map and will respond to calls for help.
* Point Patrol. Allows you to create a specific path for the enemy to follow. Click on
it and use numbers 1 to 9 on keyboard to define it. The enemy will travel to each
point in sequential order, staying within 10 tiles of each point.
* Random Point Patrol. Same as point patrol, except that the enemy will randomly
choose which point to go to next.
ATTITUDE.
* Defensive. Is more cautious in battle.
* Cunning. Searches extensively for cover.
* Brave. More interested in the fight.
* Aggressive. Into killing at all costs.
* Aid. Brave or Cunning. Will call to other enemy’s for help.
* Solo. Brave or Cunning. Fearless, does not call for help.
STRONGARM SUB-PANEL.

This is where you can specify your enemy’s experience level and attributes.
Experience level ranges from 1 to 9, where 1 is a novice.
Attributes range from 1 to 100. 1 is useless, 100 is incredibly high.
The value entered in the health field represents the maximum possible health. Current health represents the current state of the enemy’s health. Its value would therefore be equal to, or less than, health.
GUN SUB-PANEL.

This is where you specify what your enemy’s inventory is and what he will drop.
NOTE: If you have set the .ini file to ‘enemy’s drop all’, you need not set any drop items.
Selecting this button shows a silhouette with different boxes over different body parts, and 4 boxes to the right which are used for carried items.
The enemy’s primary hand slot is over the left hand.
Keep in mind that certain non-weapon items, med kits, toolbox etc…are not used by the enemy, but can still be dropped for use by the player. If you wish item(s) to be dropped, place a check in the relevant box next to the item(s).
Enemy do not run out of ammo. Therefore, you need not give ammo to them unless you want them to drop it.
Grenades, 40mm shells and mortar shell are ammo that does run out. Therefore, you must equip your enemy with sufficient of these to do the task(s) you intend will potentially happen.
To choose the item for any slot, right click on the box. The Item Selection sub-panel will appear.
Example: To give the enemy a weapon, right click on his left hand box and make sure the weapons tab is selected. Scroll through the available weapons and left click to select one.
You will be returned to his body profile and the selected weapon will appear in the box.
NOTE: The editor will not prevent you from putting inappropriate items in the various slots. For instance, it will allow you to select armour for the hand slot or a weapon for the head slot. Should you place inappropriate items, you will get unexpected and undesirable results in-game.
You can alter or enhance some items used by an enemy. If you left click on an item given to your enemy, you may see some extra information appear on the right side of the blue panel. For instance: You may add ceramic plates to certain types of armour, or silencers, scopes etc.. to carried weapons.
GRENADE LAUNCHERS AND MORTARS.
If you would like your enemy to use a grenade launcher or mortar, choose one of the 4 slots on the right and add a launcher or mortar here. DO NOT PLACE THEM IN HIS HANDS. You will also need to give ammo for these items. Again, choose one of the 4 slots to the left and place the ammo there. Enemy will not use underslung grenade launchers.
PLACING BLOODCATS.
With the Bloodcat button chosen, left click to place a Bloodcat. Everything is exactly the same as for enemy. Follow the steps above to specify attitude, orders and attribute values.
Bloodcats do not benefit from marksmanship values or use inventory items.
As has been mentioned before, you can change an enemy/civilian into an entirely different item.
The best idea, is to cycle through the various options open to you and decide upon what will work best for your own ideas/scenarios.
Below is the screen shot showing the blue sub-panel with two arrows pointing away from each other. Between, it shows ‘random’.
Use the arrows to cycle through everything that is available to you and decide upon what you want. Hit ENTER and the selected enemy/civilian is changed.

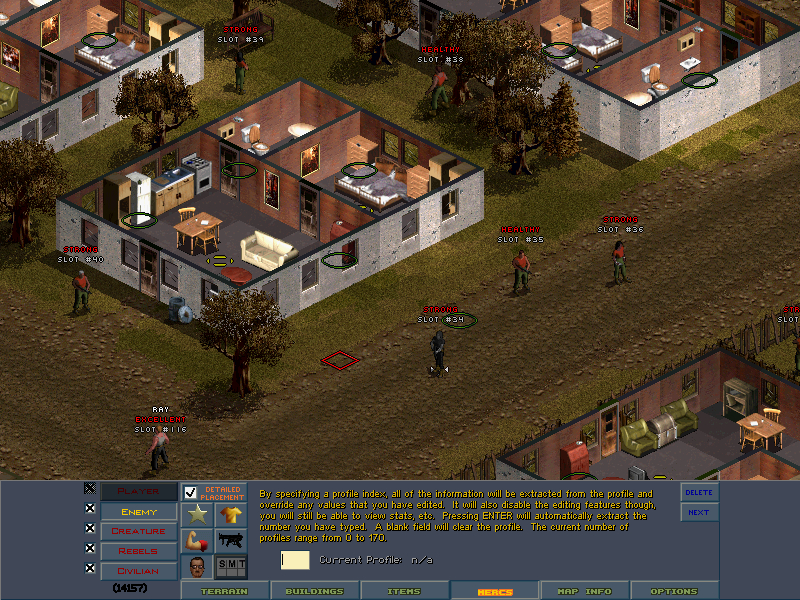
PLACE NPC/RPC.
To place a character with a profile, that is, a character listed in the PROEDIT utility.
You would be advised to familiarize yourself with this utility and take any relevant notes before attempting to place NPC and especially RPC.
To place a character with a profile: Place a civilian or enemy on your map and leave them ‘selected’.
Open Detailed Placement tab, then Profile tab. See screen shot below.
Enter a valid character ID number, taken from PROEDIT, you now have that character in your map, along with all the relevant traits and detail.
Remember: You must set the ‘map appearance’ in PROEDIT to that of the map you are doing. PROEDIT: Edit Hidden: Sector.
5) MAP INFO.
The Map Info tab allows you to control some general map aspects. From left to right, you have the following options.

COLOR TINT.
The 3 boxes on the far left allow you to tint your map red, green or blue. Merely enter a value and hit ENTER.
LIGHT TIMERS.
The boxes with Prime, Night and 24hr, allow you to set the timing of when lights will be on in your map.
The overall light level in Outdoor maps is controlled by the time of day that is tracked by the game, so lights during daylight hours are unnecessary.
Prime lights come on more or less between the hours of 8pm and midnight.
Night lights come on during the entire night cycle and go off some time in the early hours of the morning.
24hr lights are primarily for use in basements and caves where there is no ‘daylight’.
You must choose one of these settings BEFORE setting your lights. You cannot change the time of an already placed light, so if you want to change a night light for a prime light, you must delete the night light and then place your prime.
LIGHT RADIUS AND MAP LIGHT LEVEL.
You can control the brightness of each light you put down by changing the radius.
The brightest setting is 8.
As previously mentioned, the overall light level in outdoor maps is controlled by the time of day tracked by the game. You can however, enter a value into the Underground Light Level box to dim the light level of the map you are working on, so that you can better see the effect of your lights. This value will NOT be saved in outdoor maps.
Underground and cave level maps DO save this value.
EXIT GRIDS.
The button that displays the graphic with the red dots allows you to place ‘Exit Grids’.
Exit grids, in general, are only used when you need to change levels from within a sector, ie. Go to a basement sector.
When you mark a tile with an exit grid, it basically functions as a teleporter, to automatically move a MERC (or MERCS) to another position.
This is how you move MERCS up and down stairs or ladders to different map levels.
It is also possible to use this system to transfer MERCS between distant sectors, both above, and below ground.
Before reading further, NOTE, that you must set the tile number in the map you want to go to BEFORE placing the exit grid (red cross). Place at least TWO of the exit grid crosses next to each other and make sure that the destination tile (grid number) has at least 6 FREE tiles around it.
The first field is the destination sector.
The second field is for the destination level.
The third is for the numerical value of the grid where you would like your MERCS to arrive.
DESTINATION SECTOR.
This is simply the sector the levels are located within. If the level you want your squad to arrive in is G7, then enter G7.
DESTINATION LEVEL.
A ground level map is Level 0, first basement level is 1, second basement level is 2 and the third basement level is 3. You cannot go any lower than level 3.
Enter the appropriate level number for the level you want to arrive in.
GRIDNO.
A gridno. Is the numerical position of a tile on the map.
As you move your cursor around the map, a 5 digit number appears in the bottom left corner or the blue panel. This number is the gridno.
Enter the gridno. of the tile you want your squad to arrive on, remembering to make sure there is nothing on that grid and that there is at least 6 free tiles surrounding the grid.
Example:
Lets say you are on the ground level of sector A1 and want to move your MERCS to a map directly below it (basement level 1).
You would enter A1 in the destination sector, and 1 in the destination field.
You then need to get the destination gridno. from the map you intend going to.
Load the basement map you intend going to and pick your arrival spot, place an exit grid if you want your MERCS to go up as well as down, note the gridno.
Re-load your ground level map and enter the gridno. in the destination gridno. field.
To move a squad back up, you would have to enter the same type of info in the basement map as well. So, make a note of the gridno. for the exit grid of the ground level map, and then load the basement map. A1 would still be the destination sector, the destination level will be 0 and the gridno. would be derived for the arrival/exit grid of the ground level map.
ENTRY/EXIT POINTS.
In order for MERCS to travel between sectors, there MUST be entry/exit points positioned along the edges.
The N, S, E and W buttons allow you to do this.
With N button selected, find a location along the northern edge of your map that has enough room for your squad to arrive in and click on it. The N point has been marked.
Do this for the remaining S, E and W points so that all 4 edges of your map are notated correctly. The game will use this tile as the starting point for calculating which tiles are valid for MERCS to arrive in when entering a map.
Now use the C button to place a marker roughly central to your map. This must be a relatively clear space. Use the ‘I’ key to zoom out for a better idea of location.
The game uses these points when making various decisions and calculations, and it is VERY IMPORTANT THAT THEY BE PRESENT.
ISOLATED ENTRY POINT.
Although rare, depending upon what you do with your maps, you may need an isolated entry point.
If you enclose an area of your map (eg. fence in the perimeter), so that it can only be entered from a certain adjoining area of a map, you would need to mark the interior with an isolated entry point in order for the game to calculate valid entry points.
ADDITIONAL INFO
MAKING A BASEMENT MAP.
Not all tilesets are appropriate for basements. Look for the tilesets labelled as underground or basement. You must see an all brown texture when you change to the tileset, otherwise the roof and walls will not look correct in your map. Since the editor is defaulted to making outdoor maps, you MUST click on the NEW BASEMENT button( 2nd. from left in MISC.TAB) before placing anything on your map.
When making basements, you will more or less do the same things that you did for an above ground map. Keep in mind however, that the editor will not stop you from placing trees and other outdoor looking objects.
The biggest difference between outdoor and basement maps, is how you draw the rooms of your building. When working in a basement, you will still use the ADD A NEW ROOM, from the Building Method section of the Buildings Tab, to choose the graphics for your wall and floor. However, you WILL NOT use this to actually draw your rooms.
Basements and caves work by REMOVING areas from the map to form rooms. So, to actually put down walls and floors, you will choose the REMOVE AN AREA FROM AN EXISTING BUILDING button. Left click, hold and drag a box over the section you would like to remove, and you will see your room appear when you release the mouse button. If you need to fill in a section (chunk) that you have removed, then use the ADD A NEW ROOM button and drag an area to fill in and make inaccessible again.
You still place walls, furniture, wall decals, debris etc… the same way you would in an outdoor map. However, though most tilesets contain 4 different types of walls, only 2 can actually be used properly underground: Build 30 and Build 19B. They should be visually obvious. This also applies to sewers.
When you are totally done working on your basement, you will need to mark all the areas with room number information (just like an outdoor level), and then follow the steps described below, to ‘cover’ your entire level with a roof texture that matches the unused areas, otherwise, the player will see the whole map upon entry.
To cover your basement with a roof texture, change to the MAP INFO TAB and temporarily mark the map as OUTDOORS, instead of BASEMENT. Return to the building tab and choose the ADD/REPLACE BUILDING’S ROOF WITH NEW FLAT ROOF button. Right click on it and choose the dark texture that is on the very left (this texture will match the unused roof area). Click once anywhere in the interior of the basement and the entire area will be filled. Return to the MAP INFO TAB and change the map back to BASEMENT.
HIDING BASEMENT ROOFS.
You can still use H to hide the roof in a basement, however, this will hide all the roof area, including the areas where there is no building at all. While this can be useful, during the making of your basement, it will not give you a very good impression of how the map will look to the player. When you have filled in the entire level and want to see how it will look to the player, you can hit ALT-H to cycle between different modes of hiding roofs.
MAKING A CAVE LEVEL.
Caves are similar to basements in that you will remove areas to make the caves by using the REMOVE AN AREA FRON AN EXISTING BUILDING button. REMEMBER to choose the CAVE tileset, or your graphics will be very messed up. Again, since the editor is defaulted to making outdoor maps, you MUST click on the NEW CAVE LEVEL button (3rd from left in MISC TAB) before placing anything on your map.
There is only 1 button for drawing the cave walls under the Building Method section. With this button selected, right click, hold and drag to remove sections of the cave. To add sections back in, left click, hold and drag. You may use any brush size while drawing caves, and setting your brush size to Small will allow you to create irregular looking cave walls. You can find cave ‘décor’ pieces in the furniture sections.
There are no roofs or room numbers to worry about when making caves, since lighting is used to ‘hide’ the cave areas from the player. In the MAP INFO TAB, set the underground light level quite low (3 to 5), and use the radius lights throughout the cave. All the lights will be ‘hidden’ from the player, leaving the map very dark, until their mercs actually see them using their line of sight.
FILE NAMES.
Above Ground Map:
|
A9.DAT, C4.DAT etc…..
|
First Basement/Cave:
|
A9_B1.DAT, C4_B1.DAT etc….
|
Second Basement/Cave:
|
A9_B2.DAT, C4_B2.DAT etc….
|
Third Basement/Cave:
|
A9_B3.DAT, C4_B3.DAT etc….
|
SHORTCUT KEYS.
Save:
|
CTRL-S
|
Load:
|
CTRL-L
|
Exit:
|
Esc.
|
Draw Ground Textures:
|
G
|
Cycle brush sizes:
|
A & Z
|
Cycle brush sizes:
|
. (period) & , (comma)
|
Increase brush density:
|
]
|
Decrease brush density:
|
[
|
| Cycle through graphics on brush: |
Page up & Page down |
| Clear graphics on brush: |
Space bar |
| Undo last change: |
Backspace |
| Erase: |
E |
| Select building tab: |
B |
| Select debris: |
D |
| Select trees & bushes: |
T |
| Select rocks: |
R |
| Select other junk: |
O |
| Zoom: |
I |
| Toggle treetops on/off: |
Shift=T |
| Toggle roofs on/off: |
H |
| Toggle walls on/off: |
W |
| Copy a placed enemy: |
Ctrl-C |
| Place a copied enemy: |
Ctrl-V |
| Show country map/enemy placed: |
F5 |
Comments (0)
You don't have permission to comment on this page.